


This article was originally posted on danielnorris.co.uk. You can connect with me on Twitter at @danielnorris.
Docker is a tool that I have recently been using at work and it has changed, to such a significant degree, how I approach setting up my development projects that I wanted to take a look at it in more detail for my next article.
Docker started appearing on my radar, in my previous life as a Technical Recruiter, somewhere around late 2017... I think. I hadn't been actively recruiting into this space but many of my colleagues did in some way shape or form and by the time I had left the industry late last year, I would say it had easily over a 60-70% market capitalisation of the UK tech market. This number steadily rises, the larger the category of organisations you look at, as economies of scale start to kick in and organisations can realise the efficiencies of working in a containerised environment more effectively.
The long and short of it is that a lot of companies are using the tool. If you're looking to increase your market value as a Developer then learning how to use Docker is a good way of spending an hour or two of your time. Plus, once you've set this up, it's so incredibly fast and easy to set up new projects to start hacking away on.
Docker v Vagrant
So why use Docker over some existing tools like Vagrant?
I originally used Vagrant to set up my VM's before moving to Docker. There's nothing wrong with Vagrant and it solves the "well, it worked on my machine" problem fine. The difference becomes apparent when you start looking at the speed and resource utilisation difference between the two.
Speed
The difference in speed is noticeable between the two. We're talking about the difference between seconds and minutes here. Once you have set up your images and containers the first time around, Docker makes clever use of caching to enable you to tear down all your running Docker containers for a project then re-create all of them in around 1, maybe 2 seconds. I used to go and make myself a coffee when Vagrant would startup.
Resource Utilisation
The amount of resources Vagrant uses compared to Docker is noticeable too. Every time I would spin up a new Vagrant VM, the physical space alone would amount to 3-4GB, if not more, per VM. This starts to add up once you start running multiple projects.
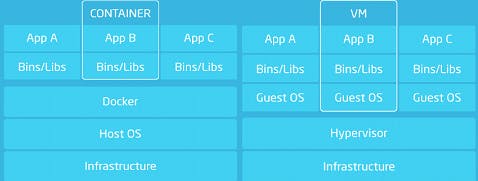
The image above is a good representation of the two approaches. The issue with Vagrant is that when you spin up a new VM, you have to host a whole new version of the OS. Whereas in Docker, you remove that overhead. You can host one OS for your Docker instance and then host as many Docker containers on top as you want.
What are we going to build exactly?
Originally, I planned to walk through step-by-step how to install Docker, pull the base images from Docker Hub, create your Dockerfile, build the images, commit the changes, create a docker-compose file and then some bash scripts to streamline some of the development workflow. Similar to the two-part series I created on building a portfolio and blog using Gatsby, Tailwind CSS, and MDX here.
The truth is, it took hours to write that series and I haven't had the time available at the moment with a new job but I have done the next best thing. I've tidied up and packaged my home Docker setup that I use for Laravel, uploaded the base images to Docker Hub, and added some additional bash scripts so that it streamlines the installation workflow for you. This means you should have a fully functioning Docker setup to hack away on in a little less than 5 minutes!
Here's what you'll be setting up:
- an Nginx server
- Ubuntu 18.04
- MySQL 5.7
- PHP 7.2
- Laravel 7.x
- Node (optional)
- Redis 5.0.x (optional)
- PHPMyAdmin (optional)
What this isn't going to cover is how you can go about creating this from scratch yourself, but I will include some pointers on where you can look or do if you want to omit some of the optional tools above.
What is Docker?
Docker is very simply, a tool that manages containers.
Containerisation is a functionality that was already native to Linux. Docker effectively acts as an API for this functionality that is already available in the Linux ecosystem and enables you to encapsulate your code and OS separately. You can have as many containers running simultaneously and side by side without them interfering with each other.
This enables you to chop and change your Docker containers for use with different use cases without having to start rebuilding your entire environment from scratch again.
There are four additional layers to Docker that are worthwhile noting:
Images
Images are what you start within your Docker workflow. I've regularly seen them referred to like a class in Object Orientated Programming and when instantiated, the instantiated object becomes a container which we'll look at shortly. For you to make a container, you need to either pull a base image from a public repository for Docker images like Docker Hub or create one based on a Dockerfile. We'll be using both methods shortly.
Container
From your image, you can build a container. Again, a better way of thinking about this is by comparing it to instantiating an object from a class. but they are not persistent. When your containers are stopped or removed any data created in the container is lost and so you need a way to keep data across sessions and also ensure they are capable of being shared across multiple containers.
Volume
Volumes are the solution to the problem above and enable us to share data across containers and ensure data is persistent. We'll use a docker-compose.yml file to create volumes for both our MySQL and Redis data stores and enable our data to persist across sessions and become accessible across multiple containers.
Network
The last key component to your Docker setup is the network. A network enables containers to communicate with each other. By default, this isn't enabled but it is easy to set up and again, we'll use our docker-compose.yml file to do this.
Getting started
Prerequisites
You'll need Docker installed to follow this. We won't cover it here but there are well-documented installation instructions for:
- macOS
- Windows
- Linux platforms
You can find more information on the docs here.
Clone the docker-compose and Dockerfile
Let's start by cloning the base Dockerfile and docker-compose.yml files I have already prepared for you.
git clone git@github.com:daniel-norris/docker-php-setup.git <projectdir>
Now open your project folder.
cd <projectdir>
If you open docker/app/Dockerfile you can take a look at how the image responsible for PHP, Nginx, and the Linux OS Ubuntu was created. You'll pull this completed image directly from Docker Hub shortly which will save you time building it and then committing the changes. However, from looking at the Dockerfile you can see that it consists of a series of commands.
It starts with choosing a base image that it pulls from Docker Hub; in this case ubuntu:18.04. Then run a series of Linux commands to install things like PHP, Composer, a series of config files for php-fpm, the Nginx server, and a shell script to start the container.
Go back to the root folder of your project and let's make the develop file executable.
chmod +x develop
If you open the develop file and take a look inside, what you'll see is that it's a simple shell script that helps to abstract some of the Docker commands you would need to ordinarily run and helps you make your developer workflow a lot smoother.
Change your environment variables
Before we go ahead and hit "install", we need to set some environment variables for your MySQL database. Let's do that now.
Open your docker-compose.yml file and edit the following variables under the db hostname.
environment:
    MYSQL_ROOT_PASSWORD: # pass for root user
    MYSQL_DATABASE: # database name
    MYSQL_USER: # username
    MYSQL_PASSWORD: # password
Install Laravel
This is the part of the process where you can choose to omit to install some of the optional tools listed above. If you wanted to set up a slimmer environment without Redis, Node, or the MySQL client PHPMyAdmin then all you would now need to do is delete the following hostnames and their details from the docker-compose.yml file:
PHPMyAdmin
  phpmyadmin:
      image: phpmyadmin
      restart: always
      ports:
          - 8090:80
      environment:
          - PMA_HOST=db
      networks:
          - laravelnet
Cache
cache:
      image: redis:alpine
      networks:
          - laravelnet
      volumes:
          - cachedata:/data
Node
node:
      build:
          context: ./docker/node
          dockerfile: Dockerfile
      image: norrisdan/node:latest
      networks:
          - laravelnet
      volumes:
          - .:/opt
      working_dir: /opt
      command: echo hi
We can now use the earlier shell script to simplify this process. Run the following, make sure you are in the root directory of your project.
./develop install
Then run this to clean up unnecessary folders created during the installation process.
./develop clean
Update your .env file
You'll need to now update your .env file with the values you originally entered in the docker-compose.yml file. Enter them here without the angled brackets.
DB_CONNECTION=mysql
DB_HOST=db
DB_PORT=3306
DB_ROOT_PASSWORD=<MYSQL_ROOT_PASSWORD>
DB_DATABASE=<MYSQL_DATABASE>
DB_USERNAME=<MYSQL_USER>
DB_PASSWORD=<MYSQL_PASSWORD>
Now update your docker-compose.yml file so that it substitutes values from your .env file as variables.
MYSQL_ROOT_PASSWORD: ${DB_ROOT_PASSWORD}
MYSQL_DATABASE: ${DB_DATABASE}
MYSQL_USER: ${DB_USERNAME}
MYSQL_PASSWORD: ${DB_PASSWORD}
Now you can start your Docker setup. This will take a little while the first time because you need to download the base images for Node, Redis, PHPMyAdmin, etc.
./develop start
Then migrate your Laravel database migrations.
./develop art migrate
Install npm dependencies and compile.
./develop npm install
./develop npm run dev --watch
Now if you go to localhost:8080 and localhost:8090. You'll be able to view your Laravel home page and log in to PHPMyAdmin using your MySQL username and password.
Useful Commands
Now that everything is working, you can take a look around your Docker setup.
Let's firstly take a look at all of the currently active running containers across our project.
docker ps
Let's now look at all of the images that we have installed across all Docker environments.
docker images ls
Now, the networks and volumes...
docker volume ls
docker network ls
Summary
That's it! 🎉
Now when you need to start or stop your containers. All you need to do is run either:
./develop start
./develop stop
You should now have a fully functioning LEMP environment running thanks to Docker. If you haven't amended the docker-compose.yml file, then you will also have a Node container running and a Redis container for caching.
If you've found this series helpful, you can show your appreciation by leaving a ⭐ on the GitHub repository here. You can also connect with me on Twitter at @danielpnorris for more content related to technology.